
|
Here's a thing I haven't talked about much. During an intense 6 month production at Funomena, I made Woorld alongside Keita Takahashi, and Vu Ha. Being one of the first AR games to take advantage of the Google Tango's mapping technology we had a lot of hurdles to overcome with constantly changing tech. I was the only 3D artist/animator and made an effort to get a lot of assets ready with fun interactions for Vu and Keita to experiment with in game. We put things in early and tested often and ended up having something that was cute, charming, and fun. Sadly not a lot of people got to experience or learn about Woorld because of it being limited to Google Tango enabled devices. Here is a small teaser trailer that I put together for the game a short time before it went up on the Google Play store. Closer to release Keita was asked to put together a video explaining a bit more about the game. If you would like to learn more as if the first teaser didn't explain it all perfectly then take a look.
2 Comments
It has been far too long since I posted on my old blog and I have decided to start fresh as a new jumping off point. I want to make an effort to share some of the things that I find interesting in my own work or something I see shared by others. I hope that even if you only have a casual interest in the subject of games animation you will still find the content of this blog interesting. For now, here is a nearly 4 year old blog post I am recycling just to share this fun little eye rig I put together. I've reworked the text a bit for clarity, but I think I want to start with even more basics next time. Vert Pushing - An Introduction to RiggingBringing characters and objects to life is the main goal of an animator, but the process of breathing life into a pile of vertices involves many facets that span both technical and creative challenges. I won't be going too deep into the processes of modeling and texturing in this blog, but I hope to share a bit about how the two work together to help rigging and animation. Modeling is the first step in defining how things will be able to move. Clean and even layout of edge loops, along with a fairly neutral pose allows for much better deformation after a model has been rigged. 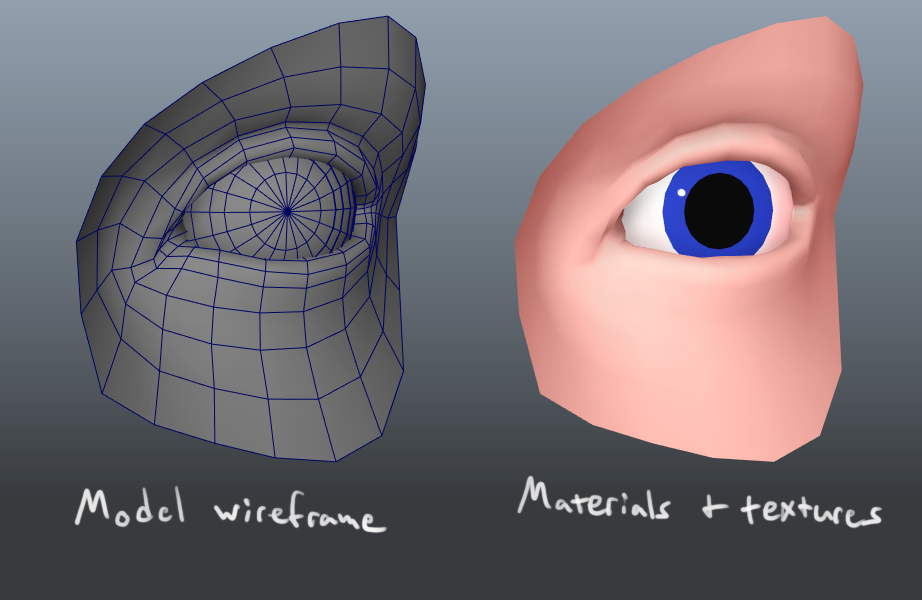 While not all animators do their own rigging, it is a critical tool to create many good 3D animations in an efficient way. Without a rig a character is just a lot of polygons with limited movement potential. The process of rigging starts by building the joints (or bones, depending on your preferred 3D packages' nomenclature) that will define how the mesh can move. In 3D animation, joints are a transform in 3D space that apply an influence over a set of vertices. This allows for the deformation of a mesh without having to manipulate vertex positions manually every time you want to create a new pose. Having good references for anatomy is always helpful when deciding where to place joints within a model. The human body is a complex machine driven by hundreds of bones, muscles, and miles of veins and arteries. In 3D animation, we try our best to simulate this complexity as needed in order to drive a compelling performance. For this rig and animation I wanted to create a simple eye that could look around and blink. The main goal was to create a "softness" to the eyelids that require less manual animation to achieve a more lifelike appearance. After settling on some joint placements that seemed to make the most sense for rotating the eyeball, opening/closing of the eyelids, and eyebrow and cheek muscles, I move onto skinning. The process of skinning, or weight-painting, involves defining the region of the mesh that a given joint can influence and determines how a model will deform. Here you can see the bone placement on the left. The skin weights of the upper eyelid bone are represented here by the color scale, where white is fully influenced by the joint transforms, and black is not influenced at all. 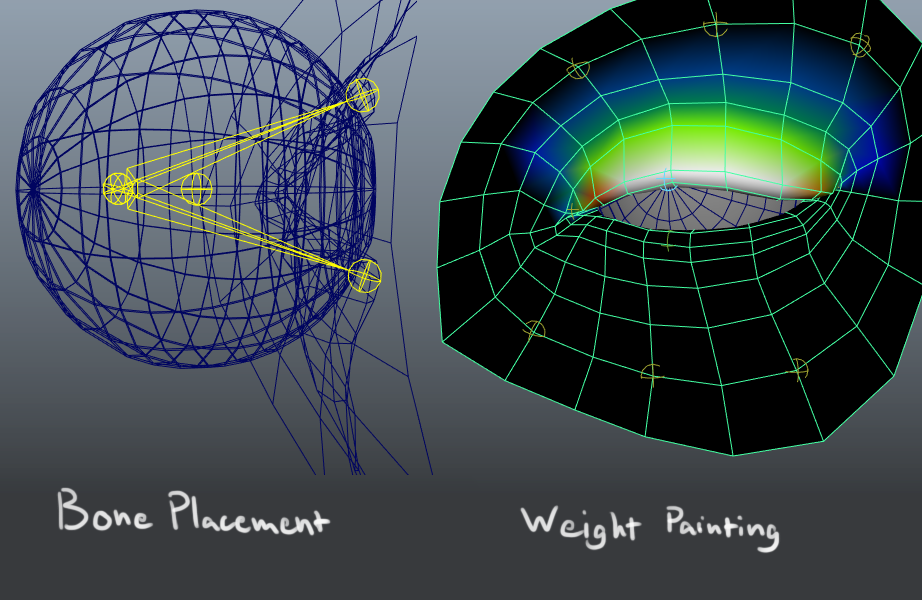 After the joints have been placed and skinned to the mesh, I create a set of animation control objects that I will later use to start bringing life to the character. Control rigs can be thought of as the strings on a puppet, or the motor of an animatronic. Control objects drive joints and the animator can then manipulate the control, which drives the joint, which drives the mesh based on the joints skin weights. A good control rig gives an animator a lot of control over the character and allows for highly expressive animations. Control rigs can also contain more complex relationships for behaviors that help to automate some smaller aspects of animation. Here you can see that the eye rotates fully to follow the center of the red circle control with a simple aim constraint. Then, the eyelid joints move slightly in coordination with the eye to help give the mesh a feeling of skin being pushed by the shape underneath. Finally, the blink is controlled by a set of driven keys when the yellow circle's Scale-Y attribute is changed. With all of this setup I am only setting animation keyframes on two different attributes (the translate X, Y, and Z of the red circle, and the scale Y of the yellow circle control) in order to get all of movement of the joints and wireframe mesh you see below.  Now the animation can begin! Using the control rig, the model can be posed to start defining a performance by setting keyframes. Keyframes are the individually defined poses at specific points in time that make up an animation. When keyframes are timed and spaced carefully it creates the illusion of movement that animator's aim for. I will go more into the principles of animation another time, but for now... I have created a simple animation using this control rig to show how just a couple of controls and a handful of keyframes can create a more complex and lifelike animation with just a bit of planning and rigging work.  |
ArchivesCategories |
 RSS Feed